./configure
make
make install
Configuring the Data Source Name (DSN)
See Teiid Spring Boot compatible options for a description of the available client configuration options.
Windows Installation
Once you have installed the ODBC Driver Client software on your workstation, you have to configure it to connect to a Teiid Spring Boot Runtime. Note that the following instructions are specific to the Microsoft Windows Platform.
To do this, you must have logged into the workstation with administrative rights, and you need to use the Control Panel’s Data Sources (ODBC) applet to add a new data source name.
Each data source name you configure can only access one VDB within a Teiid Spring Boot System. To make more than one VDB available, you need to configure more than one data source name.
Follow the below steps in creating a data source name (DSN)
-
From the Start menu, select Settings > Control Panel.
-
The Control Panel displays. Double click Administrative Tools.
-
Then Double-click Data Sources (ODBC).
-
The ODBC Data Source Administrator applet displays. Click the tab associated with the type of DSN you want to add.
-
The Create New Data Source dialog box displays. In the Select a driver for which you want to set up a data source table, select PostgreSQL Unicode.
-
Click Finish
-
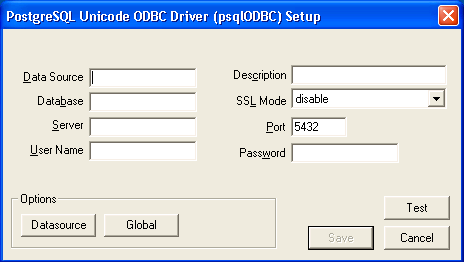
The PostgreSQL ODBC DSN Setup dialog box displays.

In the Data Source Name edit box, type the name you want to assign to this data source. In the Database edit box, type the name of the virtual database you want to access through this data source. In the Server edit box, type the host name or IP address of your Teiid Spring Boot runtime. If connecting via a firewall or NAT address, the firewall address or NAT address should be entered. In the Port edit box, type the port number to which the Teiid Spring Boot System listens for ODBC requests. By default, Teiid Spring Boot listens for ODBC requests on port 35432 In the User Name and Password edit boxes, supply the user name and password for the Teiid Spring Boot runtime access. Provide any description about the data source in the Description field.
-
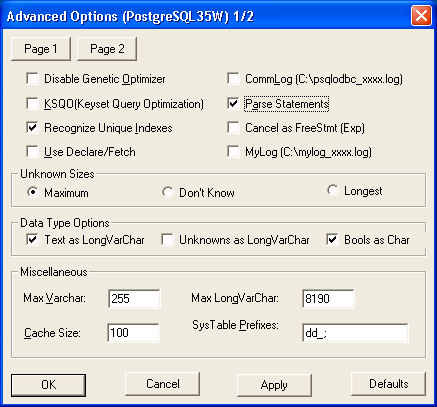
Click on the Datasource button, you will see this below figure. Configure options as shown.

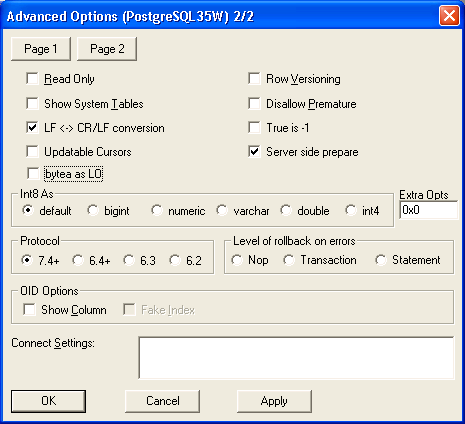
Click on "page2" and make sure the options are selected as shown

-
Click "save" and you can optionally click "test" to validate your connection if the Teiid Spring Boot is running. You have configured a Teiid Spring Boot’s virtual database as a data source for your ODBC applications. Now you can use applications such as Excel, Access to query the data in the VDB
Other *nix Platform Installations
Before you can access Teiid Spring Boot using ODBC on any *nix platforms, you need to either install a ODBC driver manager or verify that one already exists. As the ODBC Driver manager Teiid Spring Boot recommends unixODBC. If you are working with RedHat Linux or Fedora you can check the graphical "yum" installer to search, find and install unixODBC. Otherwise you can download the unixODBC manager here. To install, simply untar the contents of the file to a temporary location and execute the following commands as super user.
Check unixODBC website site for more information, if you run into any issues during the installation.
Now, to verify that PostgreSQL driver installed correctly from earlier step, execute the following command
odbcinst -q -d
That should show you all the ODBC drivers installed in your system. Now it is time to create a DSN. Edit "/etc/odbc.ini" file and add the following
  [<DSN name>]
  Driver = /usr/lib/psqlodbc.so
  Description = PostgreSQL Data Source
  Servername = <Teiid Spring Boot Host name or ip>
  Port = 35432
  Protocol = 7.4-1
  UserName = <user-name>
  Password = <password>
  Database = <vdb-name>
  ReadOnly = no
  ServerType = Postgres
  ConnSettings =
  UseServerSidePrepare=1
  Debug=0
  Fetch = 10000
  # enable below when dealing large resultsets to enable cursoring
  #UseDeclareFetch=1
Note that you need "sudo" permissions to edit the "/etc/odbc.ini" file. For all the available configurable options that you can use in defining a DSN can be found here on postgreSQL ODBC page.
Once you are done with defining the DSN, you can verify your DSN using the following command
isql <DSN-name> [<user-name> <password>] < commands.sql
where "commands.sql" file contains the SQL commands you would like to execute. You can also omit the commands.sql file, then you will be provided with a interactive shell.
|
Tip
|
You can also use languages like Perl, Python, C/C++ with ODBC ports to Postgres, or if they have direct Postgres connection modules you can use them too to connect Teiid Spring Boot and issue queries an retrieve results. |